Congratulations, you have just bought #1 Best Seller WordPress Pricing Table plugin! We hope you will give a cool new look to your site with the Go Pricing plugin!
It is recommended to choose option in case you are a first time user of the plugin.
This will download much more than just the plugin itself, you will get documentation, licences etc. in a ZIP file like this: codecanyon-3725820-go-pricing-wordpress-responsive-pricing-tables.zip.
This package contains:
Documentation: Complete documentation of the plugin, which will help you to get started, and understand how to maximise all the features of the plugin.
License: Licenses.txt contains licensing information and terms of the assets we use in the plugin and demo tables.
Plugin: The actual install file in a form of a ZIP file ('go_pricing.zip') that you will need to use to get the plugin working and installed under your site.
Freebies: Other useful stuff (for instance: Ribbons).
B.
Installable Wordpress File Only
This will download the plugin install file only, in a form of a ZIP file ('go_pricing.zip'). If this is your first time using the plugin, it is suggested to choose the 1st option.
Note: 'go_pricing.zip' is the plugin itself, this contains the executable plugin. There is an option in Wordpress to install plugins directly as a ZIP file. This is described here.
C.
License certificate & purchase code (PDF)
This will download a License Certificate in PDF format, which certifies the purchase of a product license. It contains information on the type of the license, licensee name, item details and purchase code.
D.
License certificate & purchase code (TXT)
This will download a License Certificate in text format, which certifies the purchase of a product license. It contains information on the type of the license, licensee name, item details and purchase code.
Still have a question?
3. Install the Plugin
Indifferently which download option you have chosen (see: First Steps), you will need to install the plugin the same way. This chapter will describe the steps you need to take to install the plugin.
First, make sure you have the plugin ZIP file 'go_pricing.zip' ready with you.
There are two options when it comes to installing the plugin:
A. Installing via FTP
B. Installing via WordPress Plugin Uploader
A.
Installing the plugin via FTP
Unzip the 'go_pricing.zip' file to a folder on your local drive.
Upload the 'go_pricing' folder to the WordPress plugins folder on your server (example: http://yourserver/wordpress/wp-content/plugins/) using FTP.
Loginto your WordPress admin panel and navigate to Plugins page.
Activate the plugin.
B.
Installing the plugin via WordPress Plugin Uploader
Loginto your WordPress admin panel.
Navigate to Plugins » Add New page.
Click to Upload Plugin button.
Select the the 'go_pricing.zip' file using the Choose File button and click to Install Now.
When the install is ready click to the Activate Plugin.
After activation the 'Go Pricing' menu will be added to the WordPress side navigation panel.
Installing the plugin on WordPress Multisite
You can install plugin on WordPress Multisite as well, but individual site admins cannot install plugins on their own. The process is the same as seen in the previous chapter but you will need to initiate install from Network Admin if you are using WordPress Plugin Uploader. Also, the plugin activation is different.
You have two options to activate the plugin:
Activate for the entire network as follows:
Navigate to My Sites » Network Admin » Plugins in the top navigation.
Click to Network Activate.
Network activated plugin will be enabled on all sites of the network.
Activate for an individual site as follows:
Select the site where you want to activate the plugin using My Sites » 'Your Site Name' in in the top navigation.
Navigate to Plugins page.
Activate the plugin.
Activated plugin will be enabled only on the selected site of the network.
FAQ
Have questions in the topic? You will find the related questions and answers here.
We are frequently releasing new features and bufixes to Go Pricing, so it is strongly recommended to update the plugin, to make sure that you utilise all the latest fixes, features and improvements!
Note: If you have purchased a regular or extended licence you are entitled for free(!)lifetime updates.
How do I get notified about the updates?
You are automatically getting notifications using the WordPress built-in update notification functionaliity. You can get email notifications about the available updates if you have enabled it for the product on Codecanyon.
First, make sure you have the plugin ZIP file 'go_pricing.zip' ready with you. See First Steps for download options.
There are two options when it comes to updating the plugin:
A. Updating via the Plugin Update feature
B. Updating using the FTP
A.
Updating via the Plugin Update feature
Navigate to Go Pricing » Update page.
Drag and drop the “go_pricing.zip” to the so called “drop area”, alternatively you can browse the file with the help of “Select File” button.
Note: If AJAX is turned off for the plugin, or you are using an older browser, you won't be able to use the drag and drop feature, you will need to update using “Select File” button and click to "Next".
This functionality available since v3.2.0. If you have lower version or file upload limitations then please use FTP.
B.
Updating using the FTP
Unzip the 'go_pricing.zip' file to a folder on your local drive.
Upload the 'go_pricing' folder to the WordPress plugins folder on your server (example: http://yourserver/wordpress/wp-content/plugins/) using FTP.
Note: You don't have to uninstall or deactivate the plugin before this process.
FAQ
1. I am getting “Invalid file type” error message while I am trying to update. What is the problem?
The selected file format is not valid, you can only upload zip files when you want to use the plugin’s update feature.
2. I am getting “Invalid plugin file or version!” error message while I am trying to update. What is the problem?
You are getting this error message because you were trying to install the wrong file. You should upload the plugin zip file 'go_pricing.zip' (see: First Steps). Also, downgrading is not supported, which means that you cannot upload older version than your existing one.
3. I am getting “File size exceeds the maximum upload size!” error message while I am trying to update. What is the problem?
This limitation is happening because of your server settings, if you cannot change the server settings you will need to update the plugin via FTP.
4. I am getting “PHP Error in AJAX Response!” error message or the process simply stops while I am trying to update
This can happen because of some server settings, WordPress configurations or other 3rd party codes. You can try the update with with disabled AJAX. (see: General Settings). If you still have problems after the AJAX mode is turned off, you should update the plugin using FTP.
Importing data can be used to upload the demo tables or retrieve a backed up table. Go Pricing has its own import tool, which you can access from Go Pricing menu.
Note: Demo and exported tables are stored in TXT files.
Before you start, make sure you have access to these files.
How do I get the demo tables?
Demo tables can downloaded from the plugin website. Navigate to http://www.go-pricing.com/all-samples page and you will find 'Download' buttons under each section. More than 250+ importable tables with Classic and Clean looks. You can use them to take inspiration, or just to reuse any of them.
Steps to Import Data
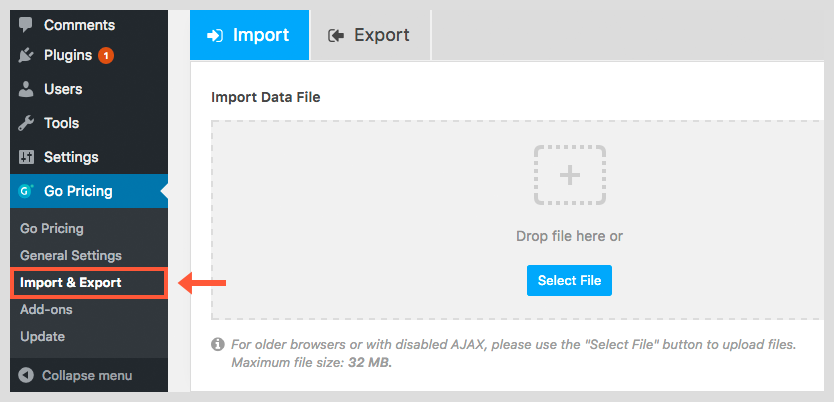
The Plugin has a dedicated page for Importing and Exporting data.
Navigate to Go Pricing » Import & Export page.
Click to Import tab.
Drag and drop the demodata TXT file to the so called 'drop area', alternatively you can browse the file with the help of 'Select File' button.
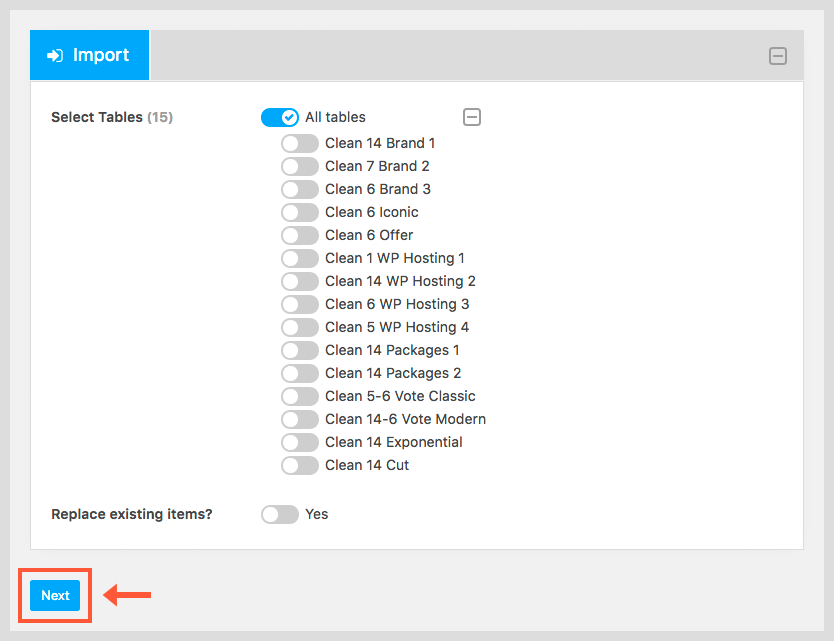
Wait till the files are uploaded, the browser usually shows the status of the upload.
Select the tables that you want to import (or just select All). Make sure that you use 'Replace existing items' option correctly. If it is on, then the tables with table ID's will be overwritten, else duplicates will be created.
Click to 'Next' button.
Note: If AJAX is turned off for the plugin, or you are using an older browser, you won't be able to use the drag and drop feature, you will need to update using 'Select File' button and click to 'Next'.
6. Export Tables
Exporting data can be used to save and backup your tables, and to reuse or upload to another WordPress environment. If you have some favorite settings and configurations, it is suggested to export them and backup them to a safe place.
Note: Export data is saved into a text file (TXT).
There are three options when it comes to exporting data:
A. Export on Import & Export page
B. Installing via WordPress Plugin Uploader
C. Export on Dashboard page
A.
Export on Import & Export page
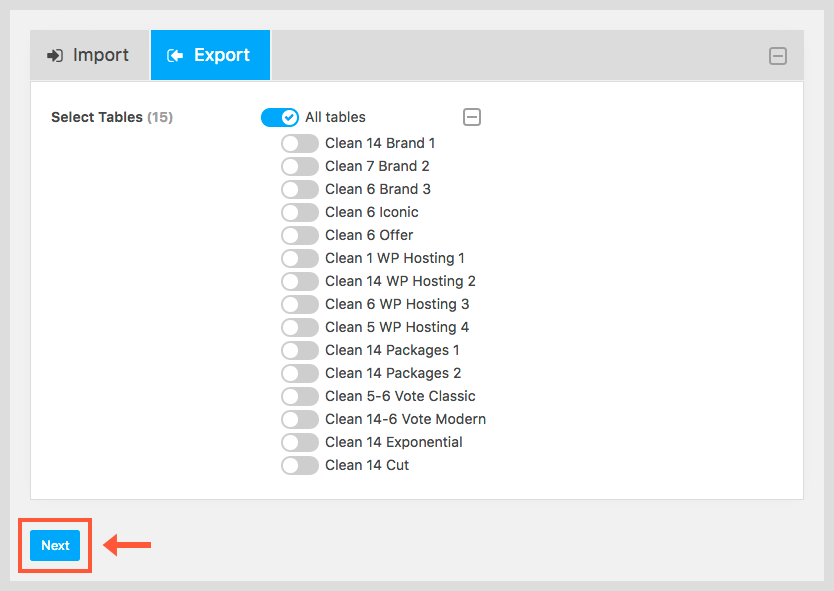
The Plugin has a dedicated page for Importing and Exporting data.
Navigate to Go Pricing » Import & Export page.
Click to Export tab.
Select the tables that you want to export (or just select All).
Click to Next button.
A.
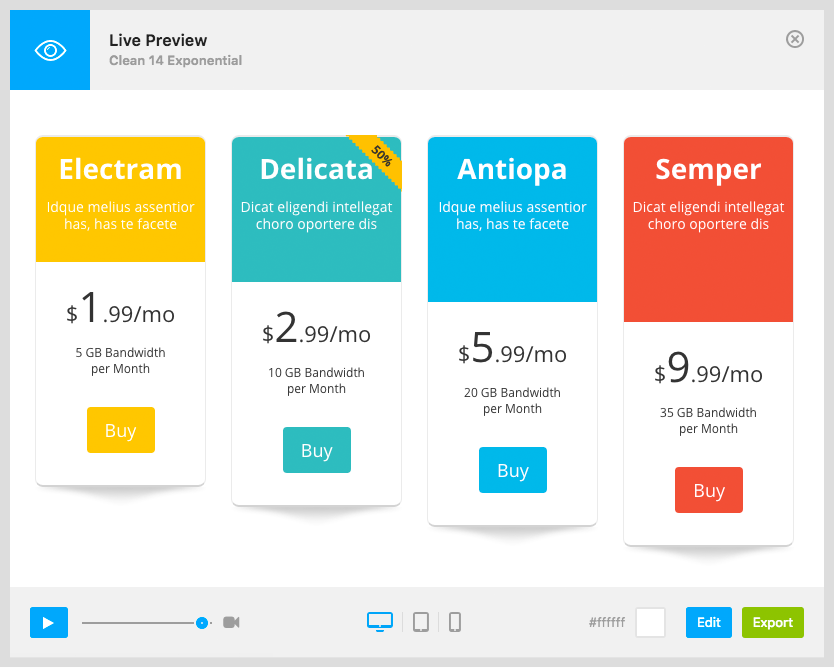
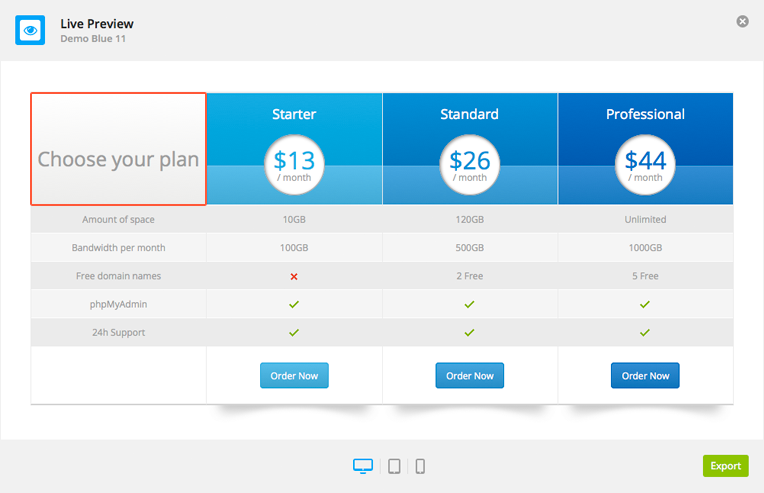
Export in Preview Popop
You can export a table when you view it in the Live Preview on Dashboard page or table editor. You should click to Export button on the bottom right corner of the popup.
A.
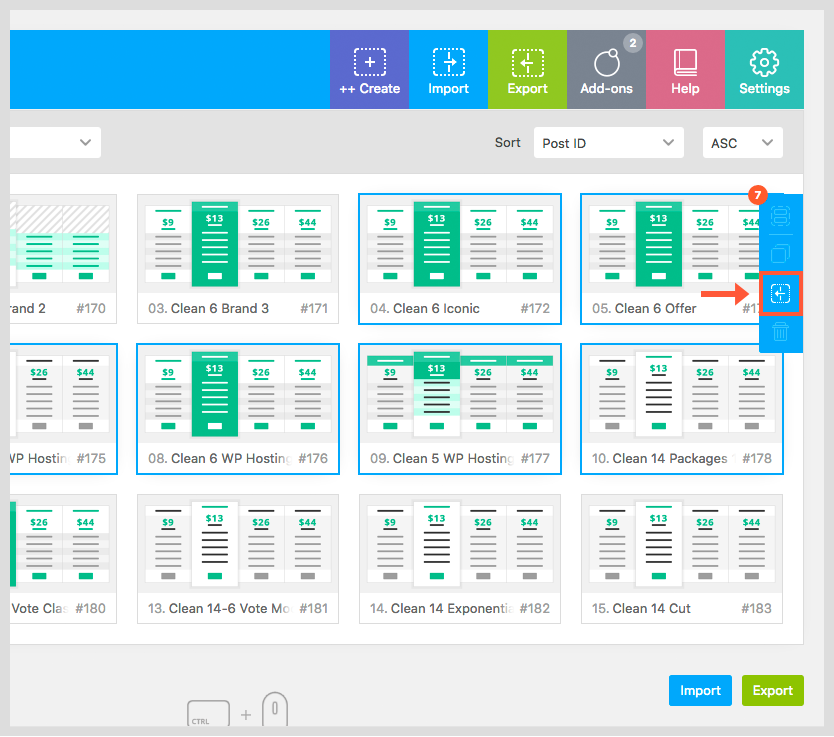
Export on Dashboard page
You can bulk export more tables on the plugin Dashboard page. You should select more tables using 'Shift/Ctrl + Click' and click to the Export icon on right side navigation bar.
The plugin has tons of features to fit your site best. It's very important to set properly before inserting shortcode.
The plugin has 3 menu items:
A. Go Pricing - For creating tables
B. General Settings - For setting up global properties
C. Import & Export - For importing & exporting demo data
A.
Import & Export demo data
You can Import & Export demo data. This feature helps you importing demo data or moving your tables from your site to another site or create a backup file.
Importing data:
Open the file that contains demo data in a text editor and copy it's content to the clipboard
Navigate to Go Pricing » Import & Export and select 'Import' action then and paste the content of the clipboard into the textarea, then click to 'Import'
Exporting data:
Navigate to Go Pricing » Import & Export and select 'Export' action
Select the tables to export
Copy the the content of the textarea to the clipboard
Create a new file on your hard drive using a text editor and paste the content of the clipboard into this file, then save
Steps of importing demo data:
After extracting the the downloaded ZIP file you can find a folder 'demodata' in the root of your folder. The 'demodata' folder contains the demo data files
Open a file in a text editor and copy it's content to the clipboard
Navigate to Go Pricing » Import & Export and select 'Import data' action then and paste the content of the clipboard into the textarea, then click to 'Import'
B.
General Settings
You can set general options here. e.g. enabling/disabling AJAX mode, user roles and you can add custom CSS code to your site here.
Note: You can fine tune the plugin to fit your site or CSS framework best.
C.
Create Pricing Table
To create tables navigate to Go Pricing. You can create new or modify and clone existing tables. You should set a Table name and Table ID first then you should set other parameters. Cloning and sorting via drag n drop rows and columns helps you to create easily tables.
Watch this Video Tutorials for further information on creating and inserting tables into you website.
Pricing tables can be inserted to pages/posts via [go_pricing id="my_table"] shortcode. The table name and the ID must be unique.
8. Insert Tables to Content
Pricing tables can be inserted to pages/posts via [go_pricing id="my_table"] shortcode.
The shortcode supports two parameters:
id: The pricing table unique ID (required)
margin_bottom: Space below pricing table (optional) - it's default value is "20px"
For example: [go_pricing id="my_table" margin_bottom="50px"].
You can insert any number of pricing tables on your site or even on one single page using these shortcodes. You can also insert tables to your site using Visual Composer.
9. How To's
1. How can I create custom header for a table?
You can create unique header in each column in each table. To replace the original header header type you should enable 'Replace default header type?' option.
Then you should place your HTML code into the 'HTML content' textarea and your CSS code into 'CSS extension' field.
2. How can I add PayPal/s2Member button or other custom buttons (e.g. WooCommerce)?
You can easily any type of buttons to pricing tables.
The plugin supports three types of buttons:
Regular link button [Regular Button]
Submit type button with the pricing table default design [Form submit button (e.g. PayPal)]
Custom button
The regular button is a simple link with the plugin default button design. It has a button text and a link source and you can also specify the link target.
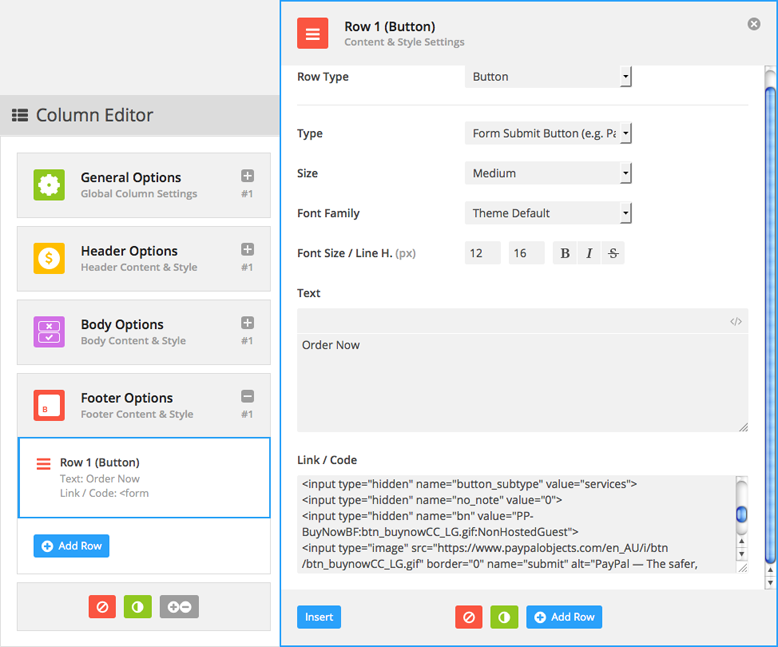
The submit type button also uses the plugin default button design. It has been designed for simple PayPal buttons. The PayPal default design is hidden. When you click to the button the PayPal form will be submitted. The s2Member plugin also generates this type of code via
shortcode.
The custom button. Selecting this type of button creates only a button wrapper. You should place the button code (HTML or shorcode e.g. WooCommerce) into button content area. You can
also add WooCommerce buttons.
Submit type button - Create s2Member/PayPal button (plugin button design)
Sometimes it's necessary to add custom CSS code to plugin CSS file (frontend).
Some examples:
Tiny modification in layout
Conflicts with other plugins' CSS code
Conflict with other themes' CSS code
We have a huge reset part in our plugin CSS file, and keep it updating to minimize these CSS conflicts.
You can add custom CSS to the plugin frontend CSS file without directly editing CSS files. Navigate to Go Pricing » General Settings submenu. You can find a Custom CSS code textarea. You can put your code here. After clicking to 'Save' button this code will be to your site.
This method is fast and main table.
You can easily add custom code to the plugin CSS without file editing, easily via admin panel. These changes also stored in database, so you won't lost these changes when you update the plugin (e.g. Because some important changes happen the main CSS file and you need to update it).
I cannot install the plugin, because I am getting error message that says: “Installing Plugin from uploaded file: codecanyon-…-pricing-tables.zip No valid plugins were found”. What should I do?
You are getting this error message, because you were trying to install the wrong file. This file is the complete Go Pricing plugin package with sample tables and documentation. Unzip this file first, and then try again then install with the: 'go_pricing.zip'. For further details, please read the First Steps section.
Is the plugin WordPress Multisite compatible?
Yes, the plugin is Multisite compatible. You should install/update the plugin through Network Admin. You may find more details here on this in the detailed documentation.
Update the plugin
I am getting “Invalid plugin file or version!” error message while I am trying to update the. What is the problem?
You are getting this error message because you were trying to install the wrong file. You should upload the plugin zip file 'go_pricing.zip' (see: First Steps). Also, downgrading is not supported, which means that you cannot upload older version than your existing one.
Import Demo Tables
How can I get the demo tables?
Demo data is not part of the downloaded package since v3.3.7. You can download it from our website.
I'm trying to download demo data from your site, but it rediects to Envato, what's wrong?
Downloading demo data reqires a valid Regular or Extended License. Envato API is used to verify your purchase. For the first time the link redirects to Envato API login page to authorize it.
Your Envato usename and purchases from us can be read only. Once "Approve" is clicked the download starts immediately.
General Errors
I am getting “Invalid file type” error message while I am trying to upload. What is the problem?
The selected file format is not valid, you can only upload zip files when you want to use the plugin’s update feature or txt demodata files when uploading demodata.
I am getting “File size exceeds the maximum upload size!” error message while I am trying to upload. What is the problem?
This limitation is happening because of your server settings, if you cannot change the server settings you will need to update the plugin via FTP.
I am getting “PHP Error in AJAX Response!” error message or the process simply stops.
This can happen because of some server settings, WordPress configurations or other 3rd party codes. You can try the process with with disabled AJAX. (see: General Settings). If you still have problems after the AJAX mode is turned off, please open a support ticket.
Classic Skin is the orignal skin of the plugin starting from the initial release. It has 6 predefined color schemes (blue, green, red, yellow, purple and earth). However you can select different color schemes for each column, the colors of the scheme cannot be changed from admin area.
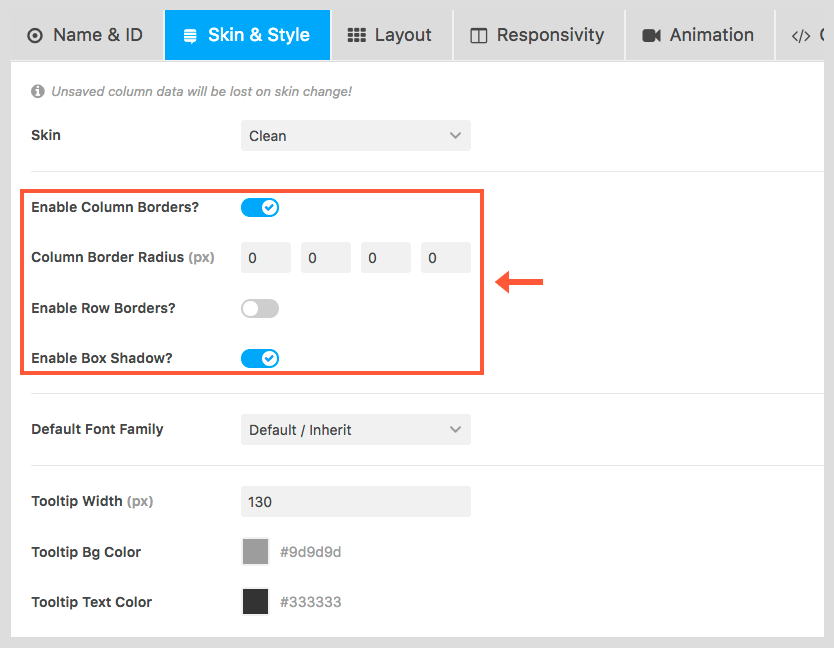
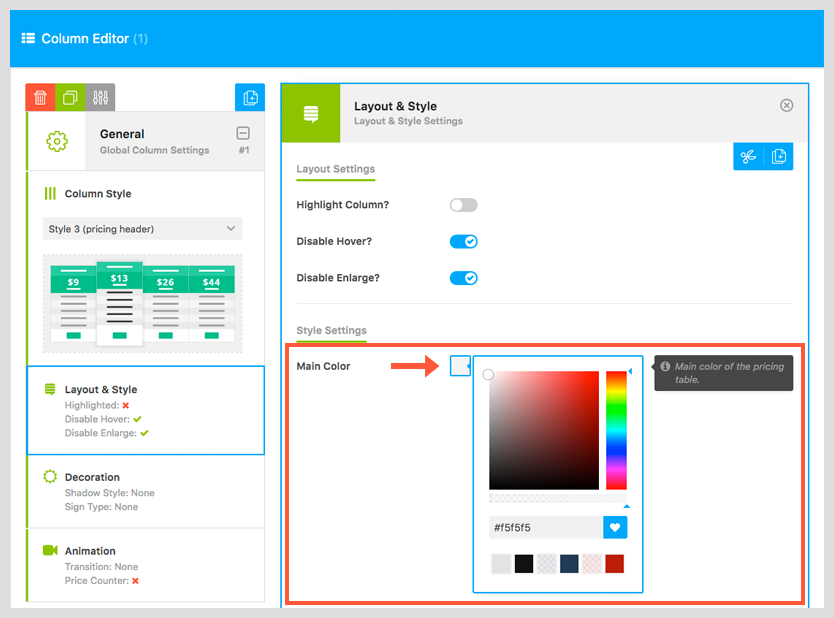
Clean Skin is available in the plugin since v3.0. It follows the sturcture of the classic skin, but it has the ability to set a custom color using a colorpicker to fully match to your site. Also it has much more options create awesome pricing tables e.g. 2 types of header layout, customizable column borders and shadows.
When you edit a table you can modify then skin and its gloabal settings under 'Layout & Style' tab.
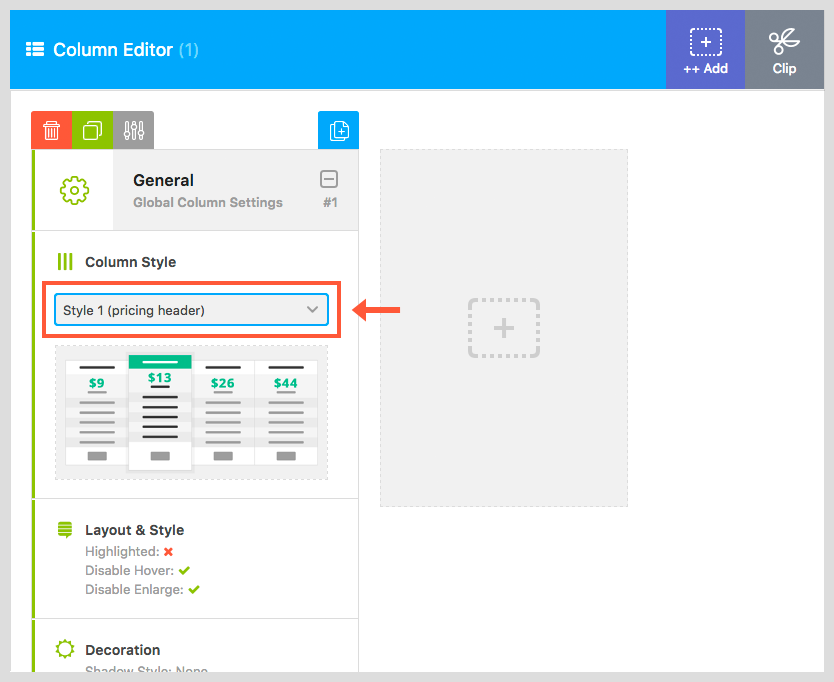
Each skin has a number of predefined column styles. Column styles also defines the layout of the columns.
Classic and Clean Skin have the same predefined column styles.
When you change the Skin from Classic to Clean you should also modify the column style for each column to preserve its original layout.
For example: If your original table uses 'Blue 3' style for their columns, after changing to Clean Skin you should select 'Style 3' for each column to preserve the original layout.
After this change you can select a unique color for the column using the Main Color option under 'General > Layout & Style' section.
Sometimes it's necessary to add some custom CSS code to your tables. Some codes should be applied generally for each table, while others are table specific. That's why we created two options to use custom CSS code for your tables.
Note: Customizing via custom CSS is often the fastest, but not the safest way to achive what you want. First, please make sure that it's not possible using the admin options for the changes you need. It's not the safest way because the plugin HTML and CSS structure may change in the future.
A.
Apply CSS code for each table
Navigate to Go Pricing » General Settings page.
Click to 'Custom CSS' tab.
Paste your code into the textarea.
Save the page.
B.
Table specific CSS code
Select a table to edit on the Dashboard page.
Click to 'Custom CSS' tab on the top of table editor page.
Paste your code into the textarea.
Save your table.
Note: CSS code you paste here will be automatically prefixed with a table id selector (e.g. #go-pricing-1234 .my-custom-rule { ... }), so please do not use id selectors in the code.
We are frequently releasing new features and bufixes to the plugin, so it is strongly recommended to keep it up do date, to make sure that you utilise all the latest fixes, features and improvements!